Natpos SDR Software
I made some SDR software. I won't say it's great, but I like it better than the other SDR software that's available, so I figure it'd be nice to share it in case anyone else might feel the same way about it. Hopefully it isn't full of an insane number of race conditions that somehow never show up when I use it but foul up the experience for everyone else, as that would make me sad.
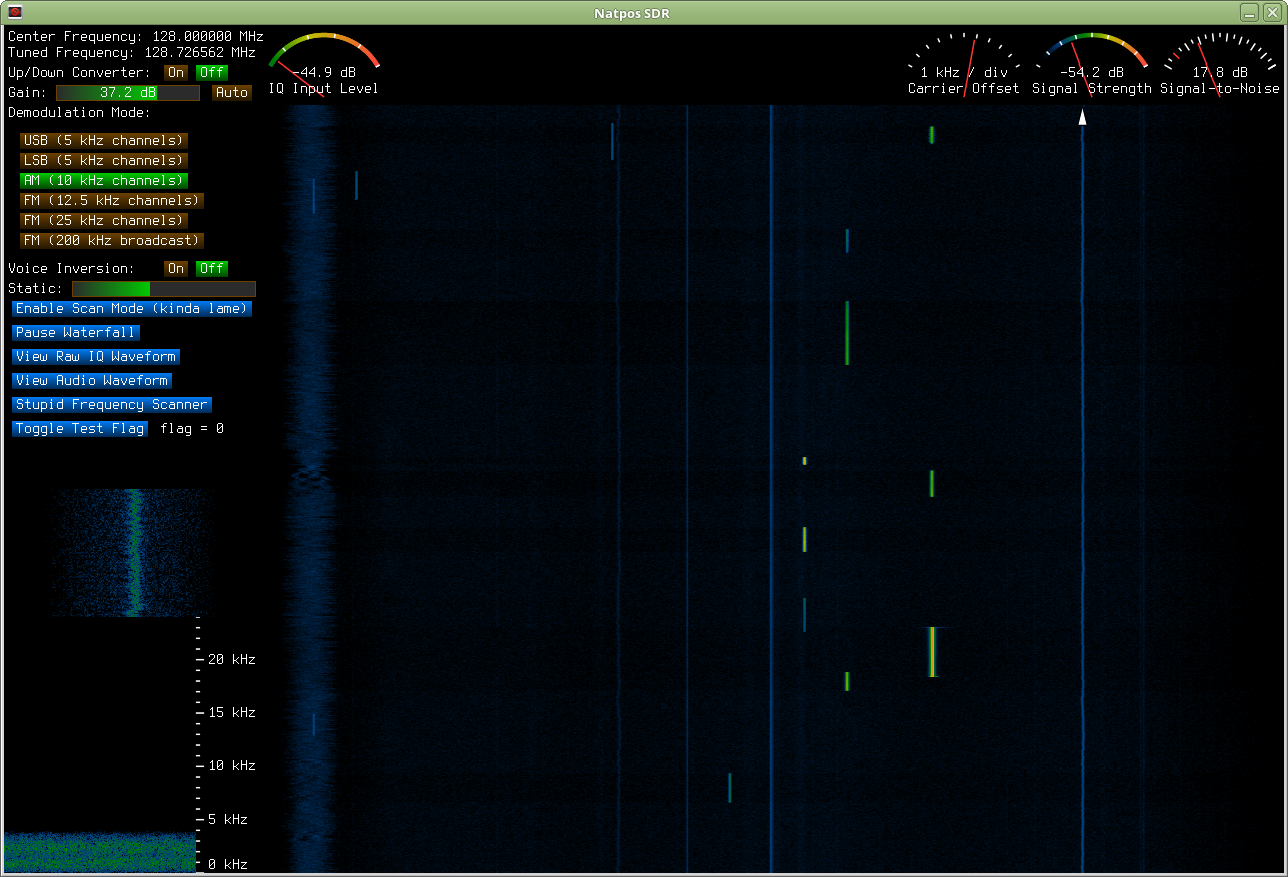
Anyway, I'll first show what it looks like and explain how to use it, and then if you're still interested, I'll explain how to compile and run it.
Anyway, I'll first show what it looks like and explain how to use it, and then if you're still interested, I'll explain how to compile and run it.
Features & Instructions
To sort of TL;DR this, I've bolded everything someone might want to find.
First, note that it only works with rtl_sdr receivers, and only via rtl_tcp, and only in Linux and it outputs audio only to ALSA. What can I say, other than that I write code for what I have? ...and that everything that isn't ALSA is fucking retarded. Does anyone do anything with PulseAudio other than Google how to get rid of it?
It is what I'd consider to be the bare minimum for an SDR application, in that it only demodulates AM, FM, USB and LSB. ...but then that seems to be true of all of the other SDR software I tried to use too, so I guess I shouldn't expect that to disappoint anyone.
To set the center frequency, just type some integer on the keyboard and press enter, and it'll tune to that MHz. There is presently no feedback on-screen as you do this, but I can't be motivated to change that as it works fine for me as it is. You can also press '[' and ']' to adjust the center frequency by 2 MHz.
To demodulate a frequency, first select the type of demodulation you want with the various buttons on the left, then click on what you want to demodulate in the waterfall. Note that where you click vertically is relevant, as this software has the ability to replay past transmissions in the waterfall history. So if a transmission occurs on a frequency you weren't tuned to, just click in front of it on the waterfall and you'll still get to hear it.
After clicking on the waterfall, you can use the mouse scroll wheel to fine-tune the frequency in 500 Hz increments. In non-SSB modes, you can use the "carrier offset" meter to know if and which way you need to adjust the tuning. The left and right arrow keys will shift by an amount equal to the channel width, as indicated on the demodulation mode buttons, e.g. 10 kHz when in AM mode. You can also hold down shift and adjust by 1/10th that amount, or hold control and adjust by 1/100th that amount, or hold both to adjust by 1/1000th that amount. You can also use the up and down arrows on the keyboard to move forward and back in time on the waterfall, which is useful after you've fine-tuned the frequency since a new click in the waterfall will mis-adjust it again.
To disable demodulation, just right-click anywhere, though I might eventually restrict this to right-clicking inside the waterfall if I decide to use right-click elsewhere in the GUI.
To set the squelch level, wait until you're listening to the level of noise you want to ignore, then press 's'. There is no means to clear the squelch; the best you can do is find a lower level of noise somewhere and press 's' on that. It's simplistic, but works when I care to use it, which is rare since the "static" control usually keeps me happy.
When using squelch, you will probably prefer to have the static slider set higher, if not all the way up.
The static slider adjusts how loud the static between transmissions is. The way this works is a bit different for AM and FM, but has effectively the same results.
For AM, stronger signals are naturally louder after demodulation, and to compensate for this, radios scale the loudness by the strength of the carrier. However, when there is no carrier, this results in essentially dividing by near-zero, which has the effect of amplifying the static to a loud level. This can be prevented by simply setting a limit on how much audio gain the radio will apply. The "static" slider simply adjusts this limit.
In FM mode, audio volume is not scaled according to carrier strength, as it is the deviation which determines amplitude. So instead, the setting of the static slider is compared to the signal strength; if the signal strength is greater than the setting of the static slider, its volume is not changed, but if it is less, then its volume is scaled according to the signal strength, e.g. a signal with only half of the signal strength given by the "static" slider will be scaled to half power. The result is similar to how it works in AM mode, though in practice I feel like it is less than ideal. If I ever think of a better way to do it, I'll change it.
Trying to use the "static" control as a volume control will lead to poor results, such as stronger transmissions being too loud. This is a result of your computer's volume control being set too high, but this not being apparent with weaker transmissions due to the static control being set too low, as lower settings on the "static" slider mean that full volume isn't reached until stronger transmissions are received. To fix this, simply adjust your computer's volume while the static control is turned all the way up, then adjust the static control as desired.
...or at least I think that'll fix it. To be honest, I'm not 100% certain that's all that's going on when I've noticed that problem. (...and keep in mind, this is a different problem from the one of seemingly 50% of the FM transmissions in my area being insanely under-modulated, a problem I have no idea what to do about.)
To use the signal-to-noise meter, it first needs to be zeroed. If you're listening to intermittent transmissions, simply wait until there is no signal, then press the "Z" key. If you're listening to a constant transmission, you'll have to find somewhere on the waterfall with noise similar to what surrounds the transmission you want to measure, click there, press Z, then click back to the signal you want to measure.
To adjust the dongle gain, simply click within the gain slider, or click the "auto" button to enable automatic gain. The consensus on the internet is that you should turn up the gain until your noise rises by 6 dB relative to what it is with the gain at its minimum. My own personal opinion is that you should adjust it so that, during the loudest transmissions, the "IQ Input Level" doesn't max out, but otherwise set it as high as you can. In any event, what you're aiming for is the best signal-to-noise ratio on the signals you're listening to, so try to figure out what does that for you and just do that.
The up/down converter option turns on and off the frequency adjustment for your up/down converter. The frequency of the up/down converter is configured in config.h. If you don't have an up/down converter, just keep this turned off.
The direct sampling option may or may not enable direct sampling mode to be used. I'm still quite unlcear on how direct sampling mode works, but the internet seems to think its as simple as telling rtl_tcp to do it, and doing that does seem to do something that seems like it works. I'm just not 100% sure as I have nothing to test it with. So this option may not work.
The enable scan mode button enables a mode where the radio automatically tunes to the strongest signal on the waterfall. This is literally the simplest way I could think of to implement such a thing, so don't expect it to work wonders, but it does work OK. There are a lot of obvious improvements that could be made to it, e.g. the option to ignore certain signals, which I'll implement whenever I get around to it. ...which might be a while, since when I really give a fuck what I'm listening to, I always use manual mode. Scan mode is just to let me ignore the radio yet still hear any transmissions that pop up. To stop scan mode, just click anywhere in the waterfall, or right-click to disable demodulation.
The voice inversion option was added in response to some FM signals I received with frequency inversion about 3400 Hz. Curious what they were, I added code to reverse it. To be a proper feature, I suppose this option should have a configurable inversion frequency, but it's a lame obfuscation which supposedly went out of style in the 70s, so I can't say I know why I'm hearing any of it at all.
The stupid frequency scanner just tunes through various center frequencies and displays how strong the IQ signal is. It's as useless as it sounds like it is. The brighter vertical lines mark every 100 MHz, with 100 MHz being the left-most one. The horizontal lines are every 10 dB I think? I dunno, who cares anyway? Anyhoo, if you want the output of this to have any meaning at all, you should certainly not use it with the gain set to "auto." You can also press enter to zero out the readings according to the data from the latest sweep.
I added this in an attempt to use the noise source of the Ham-It-Up combined with the SDR dongle to measure the effect of filters, but in practice, the information that comes out of it is complete garbage. For whatever reason, it shows the same sort of response curves regardless of what sort of filter is actually attached to it.
The View Raw IQ Waveform and View Audio Waveform buttons just do what they say, but are likely borderline useless for most people. Viewing the IQ is useful for seeing whether the gain is set so high that it's clipping, but the IQ Input Level meter is a bit of a clue about that as well, though not as accurate.
The toggle test flag does nothing. It's just there so that I can A/B test changes to the code.
You can press 'R' to begin recording audio to a randomly-named file, in a subdirectory called 'recordings' with a name like audio_8675309.raw, which will be a raw unsigned 8-bit mono 48 kHz audio. Pressing R again will close the recording file. You'll have to look at the console window to see what exactly it's doing. I suppose I really should add some on-screen indication of recording status and what file it's saving to, but it doesn't bother me, so it's low priority.
You can also press 'I' to being recording IQ data to a similarly-named file. There's no way to stop this other than to quit the program. This especially needs some on-screen status as it's easy to imagine someone accidentally turning it on and filling their hard disk with no idea why it is suddenly full and no idea where the huge file is.
Hmm... Maybe I should bold that in case it happens and someone comes here looking for help: The file consuming all of your hard disk space is in the 'recordings' subdirectory.
Of course, if one has trouble figuring out where all of their hard disk space has gone, I wrote software to help with that too.
How to Compile It
First, if you're using OpenSUSE, someone has kindly built some packages for it.
If instead you want to use it on the Raspberry Pi 3, see these extra notes.
Everyone else should start by installing the dependencies. I believe they're just this on a debian-based system:
...which I feel like I should also write instructions for, given how it took me an hour to figure it out. Basically, just sudo apt-get install rtl-sdr, then add the line blacklist dvb_usb_rtl28xxu to /etc/modprobe.d/literallyanything.conf, then unplug your dongle, type sudo rmmod dvb_usb_rtl28xxu to unload the module, then plug your dongle back in and type rtl_tcp, or maybe sudo rtl_tcp? I don't know, I hate playing simon says with my computer, so I always set my UID to zero.
If these instructions aren't cutting it, feel free to contact me for help, particularly if the compilation gives you any errors. Even if you figure out how to solve the problem yourself, I wouldn't mind hearing about it as it might be something I can fix so that other people won't run into the same problem.
If instead you want to use it on the Raspberry Pi 3, see these extra notes.
Everyone else should start by installing the dependencies. I believe they're just this on a debian-based system:
sudo apt-get install xorg-dev libgl1-mesa-dev libglfw3-dev libasound2-dev
Now just download natpos-43a.tgz or natpos-59a.tgz (see "future updates" below) and extract it somewhere, then compile the code like this:
./compile
Assuming all goes well, you'll now have an executable named "natpos" which you can execute like this:
./natpos
Of course, it won't do anything if you haven't started rtl_tcp first.
...which I feel like I should also write instructions for, given how it took me an hour to figure it out. Basically, just sudo apt-get install rtl-sdr, then add the line blacklist dvb_usb_rtl28xxu to /etc/modprobe.d/literallyanything.conf, then unplug your dongle, type sudo rmmod dvb_usb_rtl28xxu to unload the module, then plug your dongle back in and type rtl_tcp, or maybe sudo rtl_tcp? I don't know, I hate playing simon says with my computer, so I always set my UID to zero.
If these instructions aren't cutting it, feel free to contact me for help, particularly if the compilation gives you any errors. Even if you figure out how to solve the problem yourself, I wouldn't mind hearing about it as it might be something I can fix so that other people won't run into the same problem.
Past Updates
Version 34 was the original release.
Version 35 includes a change to allow decimal points to be used when entering frequency changes.
Version 36 adds what may or may not be support for direct sampling mode. (I have no device to test with.)
Version 38 includes a change to the compile script to hopefully make it capable of finding either the self-compiled GLFW or a distribution-provided GLFW. I also disabled the squelch in SSB mode and changed the default filter set to "high quality" after discovering a situation where the moderate quality filters weren't good enough.
Version 42:
- It now compiles on ARM architectures, including the Raspberry Pi (see notes)
- I added command line options for most of what was in config.h
- Minor changes to reduce GPU requirements.
- Added --lamegpu to further reduce GPU requirements.
- Added --device to select ALSA output device.
- The --offset option was broken, now fixed.
- The 200 kHz FM filter was twice as wide as it should have been, fixed.
- Left/right arrow keys now adjust by channel spacing, as selected by demodulation mode buttons. Hold shift when pressing arrows to adjust by 1/10 as much, or control to adjust by 1/100 as much, or both to adjust by 1/1000 as much. Mouse scroll wheel now always adjusts by 500 Hz.
- Fixes a memory leak that occurs when --less is used on command line.
- Adds -fcommon to GCC command line which GCC 10 now requires.
- Over-samples the waterfall FFT to display weak signals more clearly and/or waste CPU time depending on how you look at it.
- Possibly more changes. I really don't remember.
Future Updates
I stopped working on Natpos a few years ago after losing interest in SDR in general. There's nothing worth listening to in my area. Thus it is unlikely there will be any updates in the future.
However, before I stopped working on it, I made some changes. I don't recall what they all were, except for one which is that the waterfall display now shows weak signals more clearly and requires a lot more CPU than it did before. So I'm not sure if this update is genuinely better than the previous release, and so I'll just put this version here and everyone can decide for themselves whether it is better.
natpos-43a.tgz -- The last version I properly released.
natpos-59a.tgz -- The last version I was using before I lost interest.
It's quite possible that the reason I never posted it to the web site is because version 43 is superior, so if version 59 sucks, try version 43.