Having recently acquired a cheap 3D printer from eBay (only $175), I've been 3D printing a lot of stuff lately.
One day I was thinking about how I've always wanted a small pocket-size musical instrument, and decided I should make one.
In thinking about what form I wanted this instrument to take, I remembered that my nephew plays a steel pan in the school band, which has all of the notes arranged in a circle, which seemed ideal for a small hand-held device. So I inquired as to the exact layout of the notes. Turns out he plays a tenor pan, which in itself has several layouts, differing both in how many notes are in the inner ring, and which note is the lowest note. His has 5 notes in the center and a low C.
For the very first 3D print of this, which unfortunately I have no photo of, I simply traced the outline of the note areas in Blender and made buttons that exactly matched them. However, this unfortunately resulted in crazy large buttons on the outside vs. buttons too tiny to press on the inside. It was clear that I would have to do something more abstract.
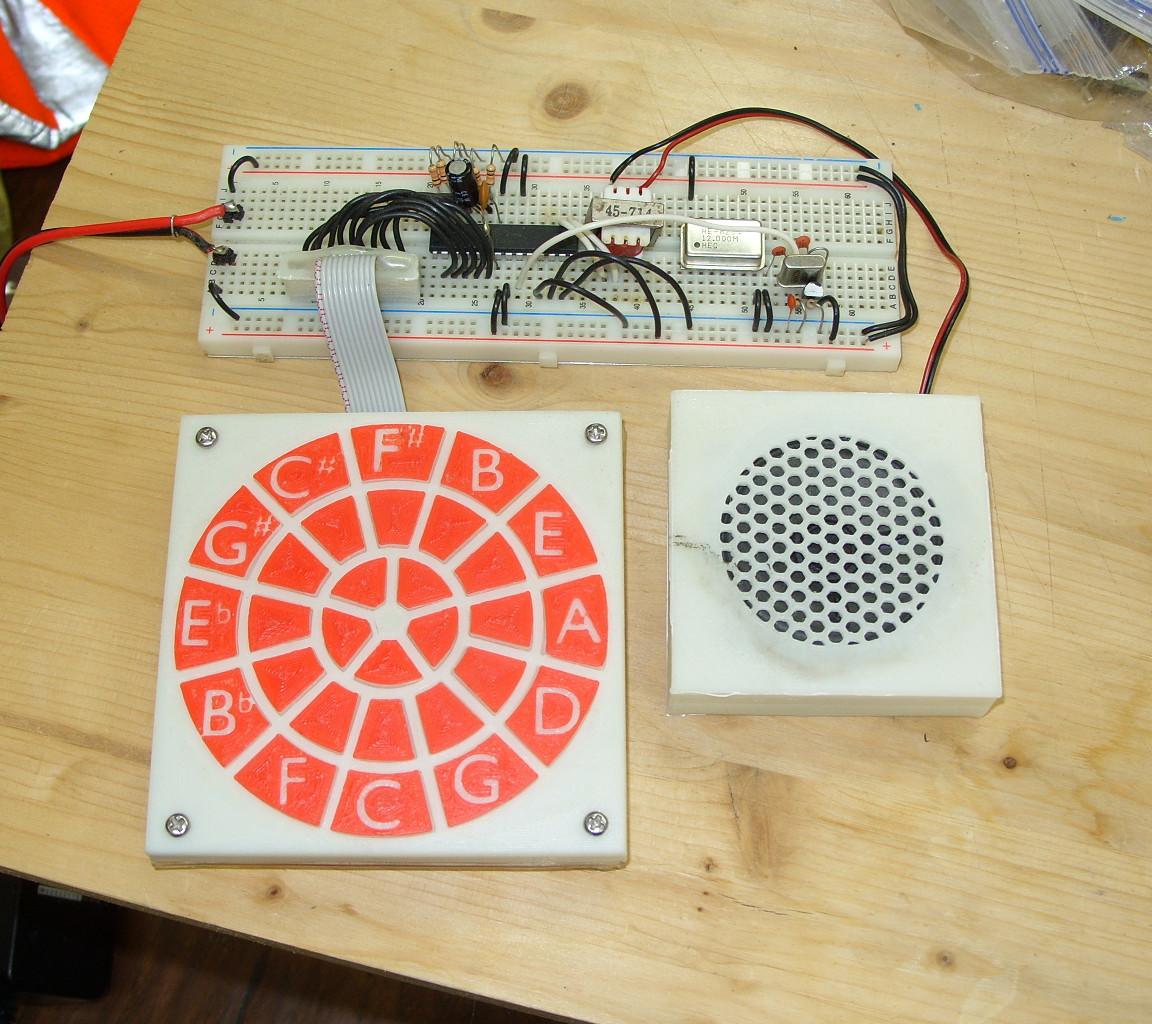
So this became the first version I built:
It uses an ATtiny48 microcontroller. The sound is simple square waves, but it can play two notes at once.
The buttons are simple "tactile buttons," not unlike these, though the ones I used came from eBay for one-tenth the price. I just 3D printed a button top that's centered over the switch with a small brim that extends under the top plate and it works like a charm, whether I press it from the center or the edges or the corners. I was surprised at how easy it was.
However, I wasn't quite happy with the button shape yet. I decided that I'd make each button have an equal surface area, and wrote a script to constantly tweak values until the surface areas were all equal.
I also went about designing a case to contain the whole thing, so that it could be a portable hand-held device.
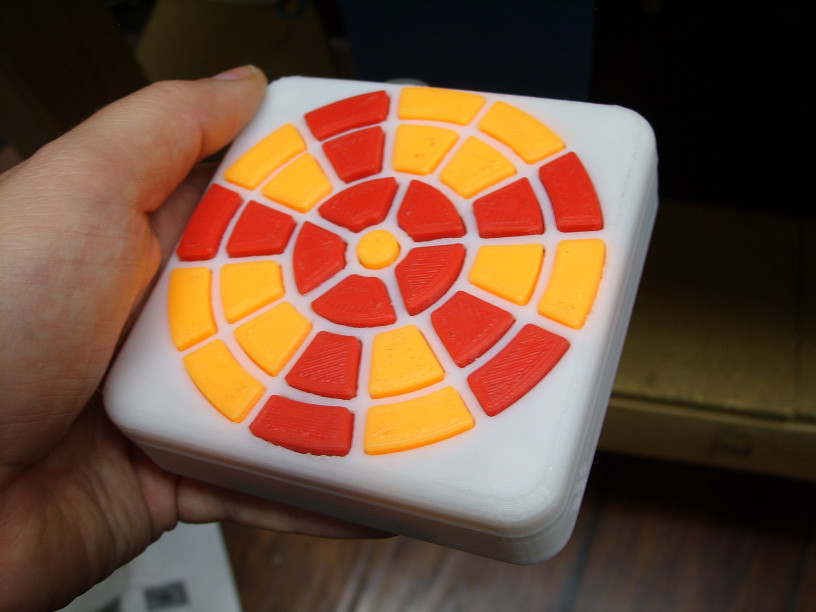
This is the second version:
The button in the center is a "setup" button. Pressing it causes it to produce the A above middle C, which is 440 Hz. Then pressing one of two other buttons adjusts the AVR's "osccal" register, thus allowing the instrument to be tuned. I also added a few other options. You can choose between notes that play until the button is released, or notes that have a short constant length, to better resemble what you get with an actual steel pan. I also added an option to produce two tones for each note, one a few cents too high, the other a few cents too low. I'd always liked this sound, but now I seem to find it's too much, and prefer to keep it in the mode where it plays just a simple square wave. Finally, it's possible to transpose the instrument between 7 different octaves, though at least 2 of those are unusuably too high or too low.
Also interesting is the battery life: It can produce sound for 20 continuous hours, and I beleive longer considering that the chip doesn't need the full battery voltage and likely consumes less current as the voltage decreases, and the speaker (which consumes most of the current) definitely requires less current when given less voltage. I imagine I've played one of these for over 20 hours, but have yet to have to replace batteries.
It doesn't have a power switch, because it simply utilizes the ATtiny48's sleep mode, entering into sleep mode as soon as it stops producing sound, and waking up instantly when any button is pressed. When in sleep mode, it consumes so little current that it would take over 15 years to drain the batteries.
This strikes me as perhaps the most valuable feature of the AVR series. Had I built this with a Z80, it would have had to have a power switch as my Z80 system wouldn't have such a low-power sleep mode, and it would require a voltage regulator, and thus enough batteries to create 7 volts, or a complex switch-mode power supply, or definitely a switch-mode power supply if I don't want to waste battery power. If I'd built it with a Raspberry Pi, it would not only require a switch-mode power supply, but it would also run less than an hour before needing new batteries.
In proper musical keyboards, I never use batteries, as it's a given that I'll forget to turn the thing off and thus only get an hour or two of play time out of a set. Since this thing doesn't have to be turned off, the batteries just seem to last forever, which is wonderful.
I decided to experiment with MIDI output, and also added a crude feature to my synthesizer to display a drawing of a steel pan and indicate which note is the next note in a song I want to learn. This seemed like a great way to learn, and indeed I learned to play the Super Mario Bros song on it, something I can't even play on a piano keyboard, but it would be even better to have the actual buttons light up, so that was my next goal.
The buttons, unfortunately, proved to not be up to the task. After little more than a week of playing the instrument, I had managed to render some of them so unusable that I had to desolder them and replace them, and it was clear that after another week I was just going to have to replace them all. About two weeks later, I tossed this unit in the trash, as the buttons were so worn that I saw no value in keeping it any longer.
So, all around, I needed new buttons, as not only were the existing ones not durable enough, but I also wanted LEDs in my buttons and I couldn't figure out how LEDs would be compatible with the tactile switches I was using since ideally I'd want both to be in the center of the button.
So I went searching for better buttons. As it turns out, almost all of those tactile buttons are rated for a life of 100,000 cycles, which may seem like a lot, but in a musical instrument where a frequently-used note may be pressed once a second, that button is going to last for only 28 hours of play time, which isn't anywhere near durable enough as I would be replacing buttons as often as I replace batteries.
In other musical instruments, the usual approach is to use silicone buttons, and they're certainly reliable enough as I've never seen one wear out, but it seems that these don't exist in generic form. If you want any at all, you have to pay thousands to have a custom mould produced, plus whatever is the cost of producing the silicone buttons.
So I asked for advice on Reddit, which produced some suggestions, but none which I really felt were appropriate. I wasn't going to pay $0.27 per button, and I still really had no idea how I was going to get LEDs in my buttons, outside of paying $1.07 per button.
I briefly considered making my own silicone buttons. I found a web site that explained that mixing corn starch with silicone caulk produces something that solidifies in only an hour. This actually works very well, and when combined with 3D printed molds, is cheap and realtively easy. The problem comes with the bit of conductive rubber on the bottom. The same web site suggested mixing in powdered graphite, and this does work, but the amount of graphite required is the absolute limit of how much can be mixed into the caulk before rendering it a mixture that simply won't hold together. Even so, I thought I might be able to mix together a batch that comes out just right, spread it out thin and flat, and let it cure, then cut it into little pieces to toss into the molds and cover with the non-conductive variety. I also considered using something other than conductive silicone. I found that if I roughed up some aluminum foil, and spread silicone on it, when it cured, the foil could not be removed from the silicone with any amount of trying. However, for reasons I don't comprehend, this stops as soon as the other side of the silicone is pressed against a 3D printed button. What silicone wasn't in contact with the plastic was still impossible to remove, but under the button, it peeled off easily. It's truly a crazy result.
Anyway, it occurred to me that rather than put foil on the bottom of silicone, perhaps I should just put foil on the bottom of 3D printed plastic.
That would require springs, which at first seemed like a serious problem. Like generic silicone buttons, generic springs don't exist either. My experience with springs in the past had me convinced that nothing short of proper spring steel would work, but I experimented with cutting some brass sheet metal into strips and then rolling it up, and the results seemed springy enough. Also, the LED could be put in the center of the spring, allowing it to show through the center of the button. Combining this with some foil tape used for HVAC purposes, I put together a few test buttons, and after they seemed to work fine, I put together a test pad.
...and at this point, I guess it's necessary that I create a YouTube account.
Well, supposedly that'll embed it. It isn't showing up in the preview, though. Hopefully that's just because Google does something retarded like try to fetch the page embedding the video before allowing it to display, which it can't do until I post it.
Anyway, as for the construction, it looked like this:
I might make a proper PCB someday, but it takes a month for that to happen, and I don't like waiting, so I just built it on some acrylic glass, using thin gauge wrapping wire to form the button contacts. The most absurd part of this is the diodes which I couldn't drill holes for since they couldn't exist on the top surface due to it being all buttons, and so they're held to the glass merely by being soldered to some of that thin-guage wrapping wire which is threaded through holes in the glass. That said, I've built like five this way and none have broken yet.
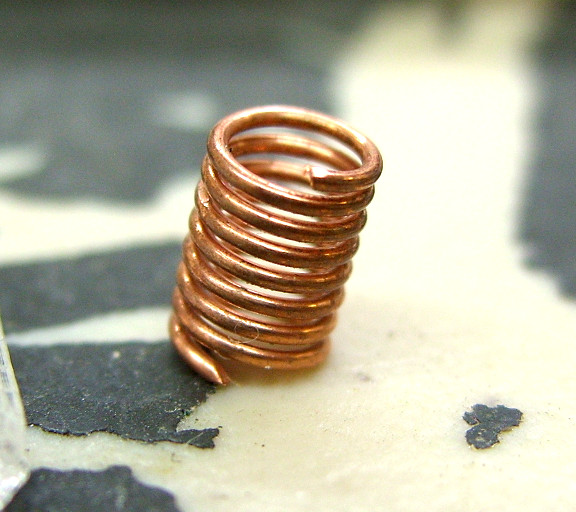
Eventually I found the brass springs to not be working out. They're difficult to form and when misformed keep getting stuck in ways they shouldn't, and so I decided to take a stab at making springs from steel wire. This almost worked, the only problem being that the springs were too stiff. So I made some out of copper wire, and those seemed just fine.
I don't know what the gauge is, but I'm pulling it out of that beige telephone wire that contains four individual wires, red, black, yellow and green.
The springs go inside of the 3D printed buttons like this:
These buttons have been used, hence the wear seen in the aluminum foil tape. I've been keeping an eye on that, hoping to predict the expected lifetime of the button. So far they've already proven to last far longer than the tactile switches I was using previously, and while the foil tape does become indented where it contacts the wrapping wire on the acrylic glass, thus far none of the foil tape seems to have broken, so I expect the buttons to last a while at least. Also, if they do wear out, I think it's about a 45 minute job to peel off the old foil and replace it with new, which would be an annoying occasional chore, but not quite as annoying as paying $1.07 per button in my opinion.
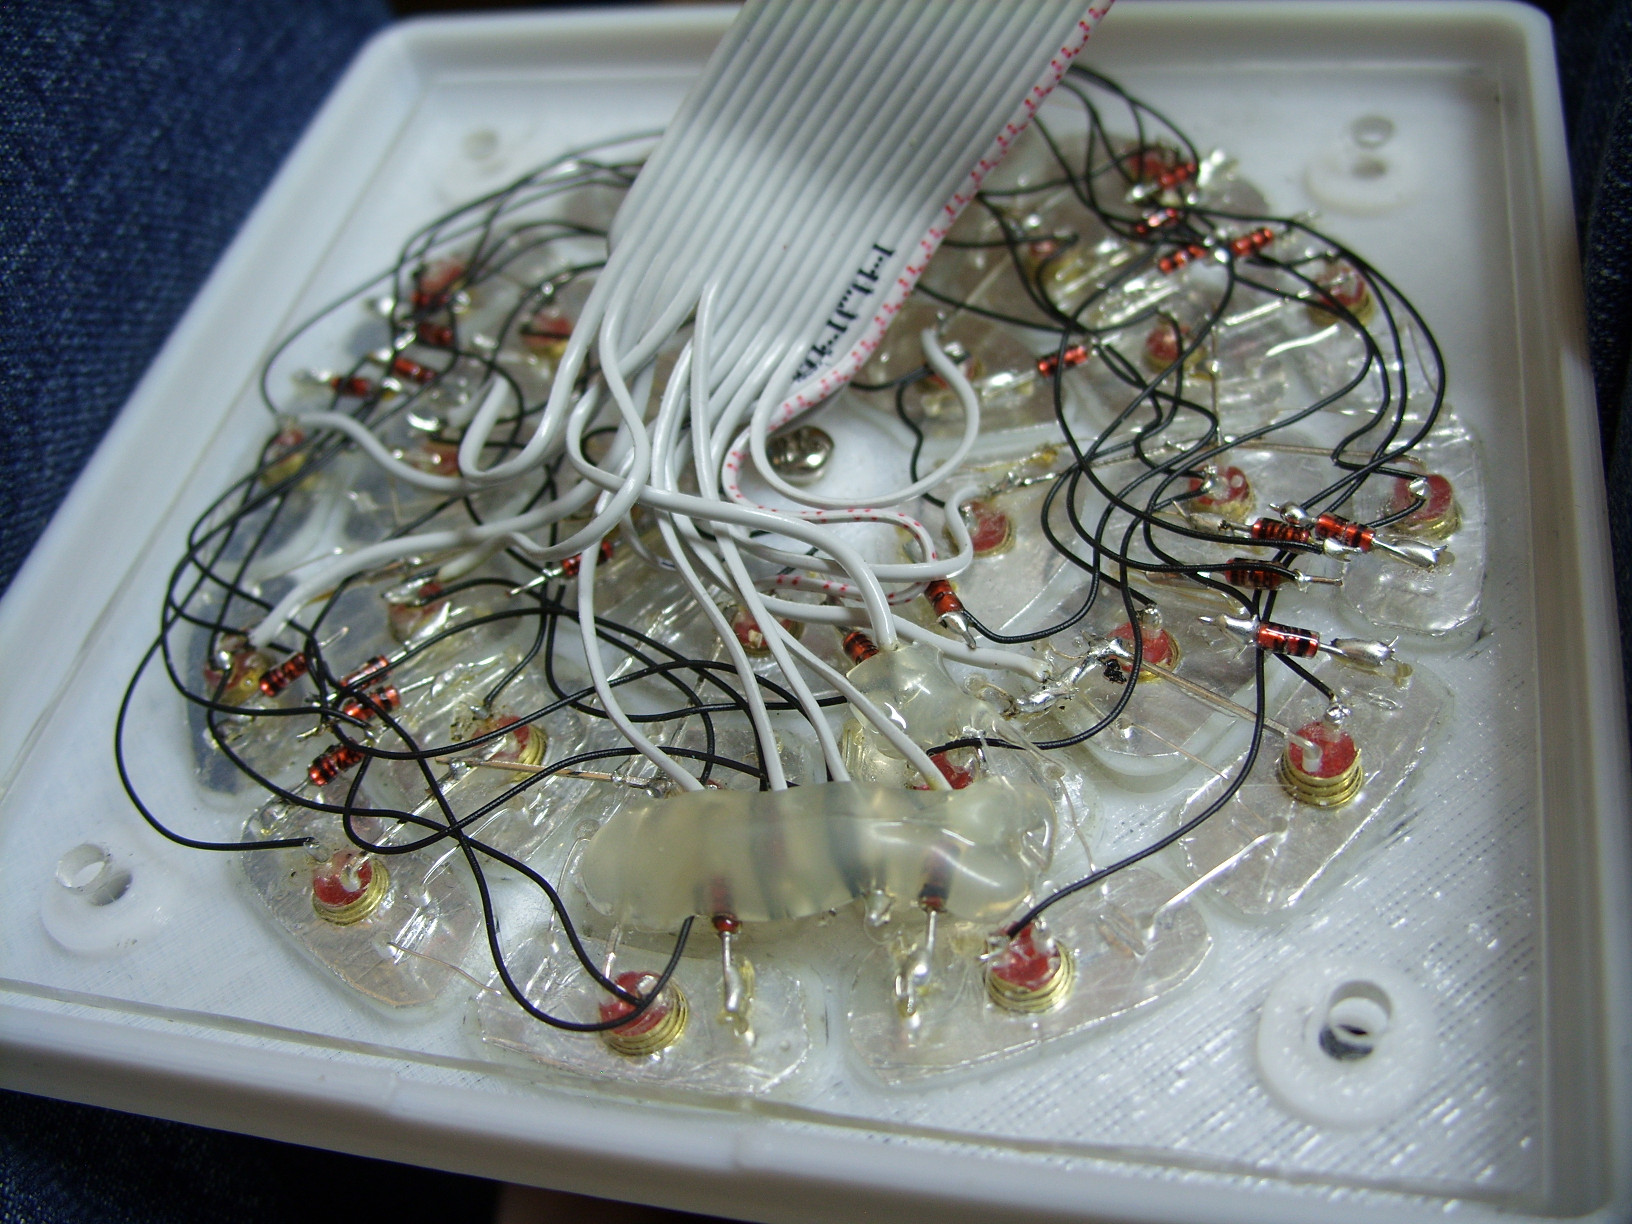
Here's a close-up of the wiring for the buttons:
I've added some purple highlighting to show where the foil-backed buttons go. As you can see, the foil conducts between two wires on opposite sides of the LED. I wasn't sure this would work all that well, but figured I could eventually make a PCB with the usual alternating traces arranged in a circle, thus providing many more opportinuties for the two contacts to come into contact, but in practice this seems to work fairly well. The only problem I had was with the buttons on the outer ring, which in later builds seems to have been solved by extending those contacts so that they go past the outer edge of those buttons, as the problem seemed to be that by pressing the button at an angle, it was possible to cause it to come to rest on the acrylic glass without touching one of the wire contacts.
As for the rest of the construction:
First thing to note is that this is a terrible way to attach batteries. In the first version I simply made a box with holes to thread wire through, which sort of worked, but had the problem that adding one battery might then stretch the box to the point that a previous battery no longer made contact with its wire. So in this one I made separate posts for each battery's terminals, which is better, but the connections made are still unreliable. Also, the batteries want to just pop out as there's nothing that holds them in place, so I've been inserting thin pieces of foam to take up the small space between the top of the batteries and the acrylic glass. Next time I redesign I'm definitely using springs. I ordered some from China on eBay to test out, but more than likely I'll just 3D print a form to wrap steel wire around to form the proper spring shape and just do that.
As for everything else: I added a 10 pin header connector in order to attach a progamming device, and also for future MIDI connections. The setup button was moved to the top/front to make room for a screw in the center of the keypad, both to provde a little more support, and to keep the acrylic glass against the buttons when it is disassembled to change batteries, so that all of the buttons and springs don't fall out. I also added 3 switches, two to select the volume, and one to allow it to be turned off. It does the automatic sleep mode like the last one, but I figured that if I want to toss this in my pocket, or my nephew wants to put his in his backpack, it would be desireable to actually turn it off so that accidental button presses don't produce noise.
The µC was upgraded to an ATmega328P, the same chip used in the Arduino, though I'm not using any Arduino software, but rather it's all assembly code, assembled with a simple AVR assembler I wrote. The upgrade was necessitated by a need for additional EEPROM, in order to store the songs which the device would light up buttons to teach me how to play. Other than the fact that I had to buy new chips, this didn't increase the cost at all, since in the years since I bought my supply of ATtiny48 chips, the ATmega328 has come down in price, and is now only $2 per unit.
Also I added a 20 MHz crystal, to remove the requirement that it be tuned. Between that, the use of the two serial port pins for MIDI, and the loss of one I/O pin by switching from the ATtiny48 to the ATmega328, I'm now using every I/O pin that the chip has. The only pin not soldered is the ADC reference, as I'm not using the ADC.
With a working design, I produced two more, one for my nephew, and one for one of my nephew's friends, whom he told me said "I would pay anything for one of those. ...well, not anything, but you know." As it turns out, "anything" would be $13 of parts + $61 of labor, if I charged minimum wage for such skilled labor. As that was all too ridiculous, I told my nephew to just let his friend have it for free. I figure if the kid wants one that much, then he should have one.
Anyway, I did learn to play the stupid thing:
Huh... YouTube's algorithms figured out the song the video contains and will apparently now show ads on the video to pay royalties for it. FFS, the song is 30 years old at this point, copyright shouldn't even be an issue. Thanks, Disney.
Anyway, copyright infringement aside, playing this thing isn't very much fun.
Years ago, out of boredom, I started trying to play my musical keyboard along with songs that I didn't know how to play. At first this went as expected, but after quite a bit of time spent doing this, I actually became fairly good at it, which surprised me since as much as I knew about such skills before this was what I'd learned in school, which was that being able to play a song merely by having heard it was a skill that one was either born with or could never acquire. As usual, my public school education has proven to be misleading. Honestly, these days, if it wasn't something I read in a textbook, I just assume that everything I learned in school was false because, in every instance when I've bothered to verify it, that has turned out to be the case.
Anyway, while I'm still not incredibly good at it, I'm good enough at it that I don't much bother to "learn" how to play anything anymore. When I want to play, I just turn on my MP3 player and play whatever it plays. Like I said, I'm not great at it, but I'm good enough that it fullfills the goal of amusing me.
...but I can't do that with this steel pan toy. The note arrangement is abysmal. I understand why it is the way that it is. It places adjecent notes on opposite sides of the pan so that when a note sounds it doesn't so much trigger the other notes that are nearby in frequency, and it keeps all of the notes in a particular key nearby each other which I assume someone considers convienent, but in terms of trying to just play music I don't know how to play, it's a nightmare. If the next note is one semitone higher than the previous, it's 5 buttons clockwise, if it's 2 semitones, it's 2 buttons counter-clockwise, if it's 3 semitones, it's 3 clockwise, if it's 4 semitones, it's 4 counter-clockwise. This by itself isn't the bad part, it only becomes bad when you consider that this borderline random arrangement means that, even if I am intending to hit the correct semitone (though often I'm not), if I'm off by just one button, the note I hear is totally different, and then I'm lost. Add to that the fact that exactly where I transistion between the inner, middle, and outer rings depends on which key the song is in, and it's just exceedingly difficult. I'm sure that, with a lot of practice, I could make some progress, but the simple fact is that this layout isn't conductive to what I want to use it for, and so a redesign is in order.
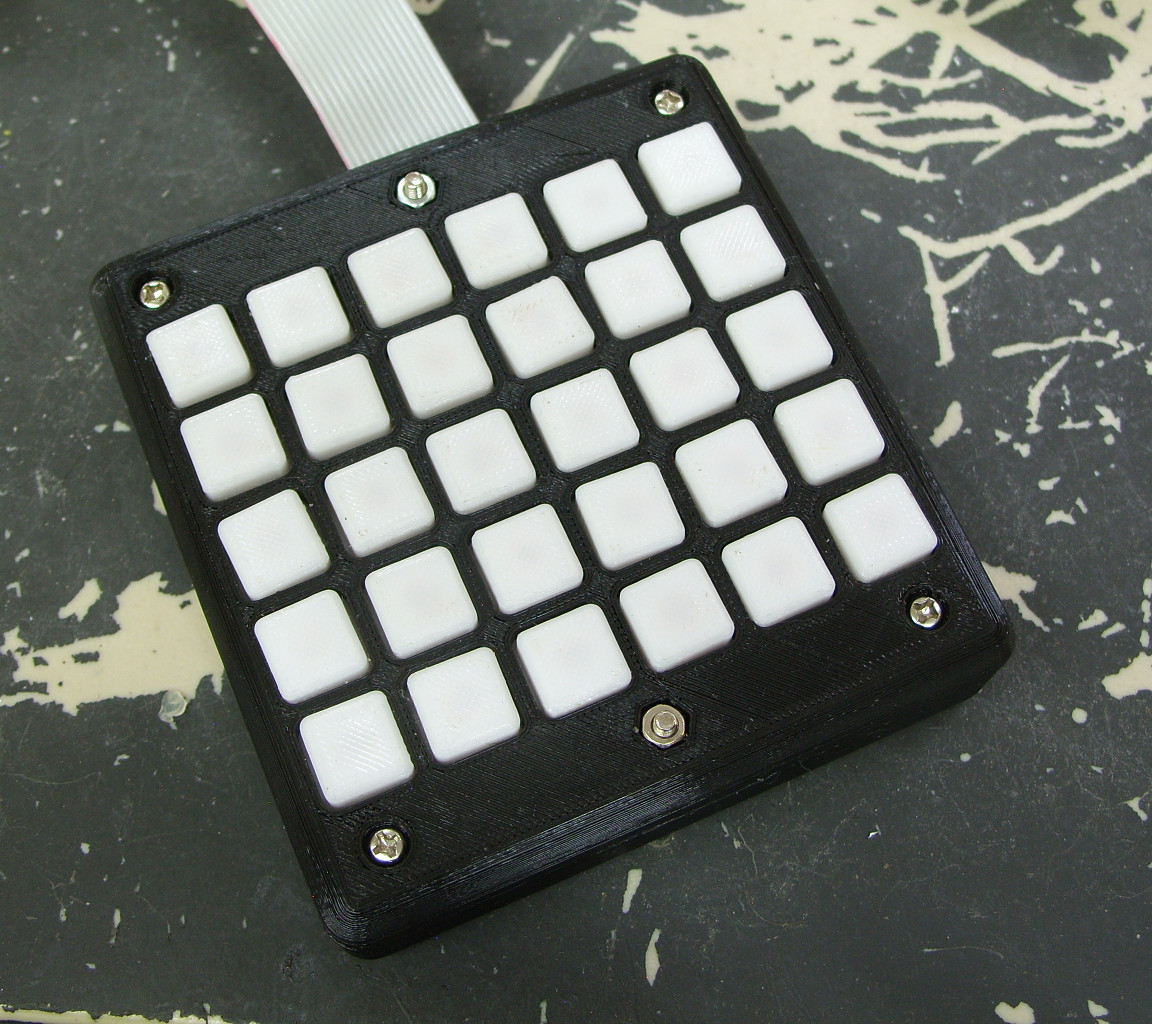
So I've decided to just do what I should have done to begin with: Just put all the fucking notes in a grid layout, in order of pitch.
This one is still a work in progress, but as you can see, I've put together a test board, hence the ribbon cable which connects to the microcontroller on some solderless breadboard. I have practiced with it for a few hours, and I'm already better at it than I am with the steel pan layout.
One thing that did surprise me is that, despite the notes being in order, my skill at figuring out songs on a piano keyboard doesn't translate to this new format very well. As best I can tell, there are two reasons for this.
The first is that, as I've said, I'm not very good at it, and so to be able to do it well, I first have to spend a minute figuring out what key the song is in. At that point I only need a skill accurate to about 2 semitones, and so I can then usually hit the right notes. Exceptions are the Family Guy theme song which doesn't much stick to a particular key, and the SMB1 song which has a lot of accidentals and is overall so random that, even knowing how to play it on the steel pan now, I still couldn't play it on a piano keyboard. Most songs however do stick to one key, and a surprising number stick to a pentatonic scale for the majority of the song. Anyway, with this layout, knowing which buttons belong to a particular key is tricky. It turns out that any key is made up of a checkerboard arrangement of buttons, but with one of the vertical colums you use all of the buttons in that column, and then the checkerboard pattern is inverted on opposite sides of that column. An obvious solution here would be to just arrange the notes like a keyboard, but the buttons are already as small as I want to make them, since any smaller and my fingers won't fit, and I really don't want the thing to become bigger since at this point it's already kind of a stretch to call it "pocket size," and I do want something I can keep in my pocket.
The other reason is simply that the increase of pitch wraps around. So a note that's say 3 semitones higher could be to the right, or it could be one row higher to the left, depending on which column the current note is in, whereas on a piano keyboard it's just always 3 keys to the right. So my brain not only has to figure out the relative pitch of the next note, but then has to decide where that note is.
Even with those problems, I do seem to be making progress towards learning this layout, so I'm going to make a portable version and keep practicing with it. Also I'm hoping that, by nature of it being so difficult to understand which notes belong to a particular key, my brain will finially learn to distinguish neighboring semitones so that it doesn't have to know what key a song is in, which would then allow me to play songs like the Family Guy theme song without so much difficulty.
Oh, and I guess I should show what it looks like when it's in the mode that teaches you to play a new song. Let's see Google figure out the copyright claim on this one: